In my last post I had shown how to install LocalStack on your local machine. Link is here.
In this post, lets create a queue which on recieving a message will trigger a lambda. All on LocalStack.
Creating Infrastructure
There are various ways to create infrastructure setup. I am going to use boto3 library on python.
Copy the following code to create a queue.
import boto3

# Create a Boto3 client for SQS.
sqs = boto3.client('sqs', endpoint_url='http://localhost:4566',region_name='us-west-2', aws_access_key_id="dummy", aws_secret_access_key= "dummy")
# Create a queue.
queue = sqs.create_queue(QueueName='input-queue')
print(queue)
Note the region is us-west-2. If you navigate into LocalStack desktop you should see the queue created under SQS.

Creating Lambda
Lets now create a lambda which we will evenually trigger from the queue. Lets first create a lambda. Create a python file with the following content. In my case file name is app.py
def lambda_handler(event,context):
    return {
        "statusCode": 200,
        "body": "Lambda triggered from SQS"
    }
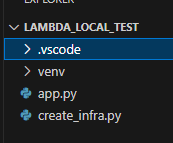
Lambda doesnt do much. It will just return status code as success. My folder structure is as shown below.

Create_infra.py is a file where I have kept the code to create queue, lambda, and I am going to bind them together.
Create a zip folder from app.py

Lets now write the code to create the lambda.
lambda_client = boto3.client('lambda',endpoint_url='http://localhost:4566',region_name='us-west-2', aws_access_key_id="dummy", aws_secret_access_key= "dummy")

lambda_client.create_function(
            FunctionName="test_lambda",
            Runtime='python3.8',
            Role='arn:aws:iam::000000000000:role/lambda-role',
            Handler="app.lambda_handler",
            Code=dict(ZipFile=open("app.zip", 'rb').read())
        )
Note you need to specify the zip file you created and that needs to be under same folder. Once lambda gets created you will see that in the lambda section of LocalStack desktop.

Binding Queue with Lambda
Lets now bind queue with lambda so that when a message arrives in queue, lambda is triggered. Execute the following code. Note that function name (the name of the function we created), and queue arn have to be specified. You can get the arn from the SQS section navigating to the queue.
response = lambda_client.create_event_source_mapping(
    EventSourceArn='arn:aws:sqs:us-west-2:000000000000:input-queue',
    FunctionName='test_lambda'
)
Validating the Setup
Lets now send a message into the queue. Lets navigate to SQS, and select the input-queue.

Switch to Messages in the tab.

In the bottom bar you should see the “Send Message” button. Click on it. Select the Queue Url and enter Message Body. The click Send button.

Message shows up in the list. However it will be picked up by the lambda.

Now navigate to the Lambda from the main dashboard. Select test-lambda.
Switch to Logs tab. You should see Start, End and Repor.

This means lambda is triggered by the message we sent on the queue.
Closing Note
LocalStack is one of the easy way to build the AWS workflow. Complex workflows can be built easily as POC and then migrated to production systems.


