SQS and Lambda on LocalStack

In my last post I had shown how to install LocalStack on your local machine. Link is here.

In this post, lets create a queue which on recieving a message will trigger a lambda. All on LocalStack.

Creating Infrastructure

There are various ways to create infrastructure setup. I am going to use boto3 library on python.

Copy the following code to create a queue.

import boto3

# Create a Boto3 client for SQS.
sqs = boto3.client('sqs', endpoint_url='http://localhost:4566',region_name='us-west-2', aws_access_key_id="dummy", aws_secret_access_key= "dummy")
# Create a queue.
queue = sqs.create_queue(QueueName='input-queue')
print(queue)

Note the region is us-west-2. If you navigate into LocalStack desktop you should see the queue created under SQS.

Creating Lambda

Lets now create a lambda which we will evenually trigger from the queue. Lets first create a lambda. Create a python file with the following content. In my case file name is app.py

def lambda_handler(event,context):    
return {
"statusCode": 200,
"body": "Lambda triggered from SQS"
}

Lambda doesnt do much. It will just return status code as success. My folder structure is as shown below.
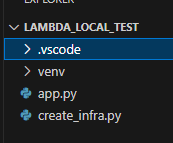
Create_infra.py is a file where I have kept the code to create queue, lambda, and I am going to bind them together.

Create a zip folder from app.py

Lets now write the code to create the lambda.

lambda_client = boto3.client('lambda',endpoint_url='http://localhost:4566',region_name='us-west-2', aws_access_key_id="dummy", aws_secret_access_key= "dummy")

lambda_client.create_function(
FunctionName="test_lambda",
Runtime='python3.8',
Role='arn:aws:iam::000000000000:role/lambda-role',
Handler="app.lambda_handler",
Code=dict(ZipFile=open("app.zip", 'rb').read())
)

Note you need to specify the zip file you created and that needs to be under same folder. Once lambda gets created you will see that in the lambda section of LocalStack desktop.

Binding Queue with Lambda

Lets now bind queue with lambda so that when a message arrives in queue, lambda is triggered. Execute the following code. Note that function name (the name of the function we created), and queue arn have to be specified. You can get the arn from the SQS section navigating to the queue.

response = lambda_client.create_event_source_mapping(
EventSourceArn='arn:aws:sqs:us-west-2:000000000000:input-queue',
FunctionName='test_lambda'
)

Validating the Setup

Lets now send a message into the queue. Lets navigate to SQS, and select the input-queue.

Switch to Messages in the tab.

In the bottom bar you should see the “Send Message” button. Click on it. Select the Queue Url and enter Message Body. The click Send button.

Message shows up in the list. However it will be picked up by the lambda.

Now navigate to the Lambda from the main dashboard. Select test-lambda.

Switch to Logs tab. You should see Start, End and Repor.

This means lambda is triggered by the message we sent on the queue.

Closing Note

LocalStack is one of the easy way to build the AWS workflow. Complex workflows can be built easily as POC and then migrated to production systems.

Debugging AWS Lambda in Local

AWS Lambda is a serverless compute service provided by Amazon Web Services (AWS). It allows you to run code without provisioning or managing servers. With Lambda, you can upload your code (written in languages such as Node.js, Python, Java, Go, and more) and AWS Lambda takes care of provisioning and managing the servers, scaling automatically to handle requests.

This blog post is about running AWS Lambda in local. We need the following pre-requisites to be installed in order to run AWS Lambda in local.

  1. sam cli – Download SAM CLI from here.
  2. VS Code
  3. Python
  4. Docker
  5. AWS Toolkit for VS Code

AWS SAM CLI

After installing run the following command to verify.

sam --version

VS Code

Create a folder and open it in VS Code. Add app.py as shown below, and add the following code.

def lambda_handler(event,context):
return {
"statusCode": 200,
"body": "Hello from lambda"
}

Select Run and Debug. And click on “create a launch.json” link. That will create a new launch.json file.

In the launch.json settings add the following content.

{
"version": "0.2.0",
"configurations": [
{
"type": "aws-sam",
"request": "direct-invoke",
"name": "Invoke Lambda",
"invokeTarget": {
"target": "code",
"lambdaHandler": "app.lambda_handler",
"projectRoot": "${workspaceFolder}"
},
"lambda": {
"runtime": "python3.10",
"payload": {
"json": {}
}
}
},
{
"name": "Python Debugger: Current File",
"type": "debugpy",
"request": "launch",
"program": "${file}",
"console": "integratedTerminal"
}
]
}

Make sure to set your version of python in the lambda runtime.

Validation

Now go to Run and Debug, and select “Invoke Lambda” as debug profile and click run.

If you dont have docker running you will see the following error.

Error: Running AWS SAM projects locally requires Docker. Have you got it installed and running?

If everything is fine, docker image is built and lambda is invoked.

You can even debug your code keeping breakpoint.

Closing Note

I started looking for ways to run my program in local without being dependent on AWS. And one of the thing I came across is lambda functions. After doing some research over the internet I skimmed through several youtube links and articles. I could find this youtube link “Tech talk with Eric” very useful in achieving the result, from which I have shared the notes above. I am sharing other resources below if you want to drill deep.

Resources

Debugging AWS Lambda Locally: Step-by-Step Guide with AWS SAM CLI and VSCode (Part 1)

Locally Debug Lambda Functions with the AWS Toolkit for VS Code

AWS Links

Step-through debugging Lambda functions locally

Tutorial: Deploying a Hello World application

Lamda Functions in Python

Myself being from .net world, I got suprised to find out that python supports lambda function. Just like in .net a lambda function is a small anonymous function in python.

A simple example below.

add = lambda x, y: x + y

result = add(3, 5)
print(result) # Output: 8

They are often used for short, simple operations that can be defined in a single line of code. And this is what most of the tutorials say how you should use it.

However I think you should use it when you want your function to be used once, and code should reflect domain logic more than code logic. Confusing?

Let me give you an example. Lets say we want to get list of first name of employees. I have seen logic goes like this most of the time.

class Employee:
def __init__(self, employee_name, employee_id):
self.employee_name = employee_name
self.employee_id = employee_id

employees = [Employee("Bob A", 1), Employee("Tom B", 2), Employee("Lisa C", 3)]

for employee in employees:
print(employee.employee_name.split()[0])

For whoever seeing the code for the first time, code runs in the mind and interpreted as extracting the first name. Now check the refined code with lambda below.

firstNameOf = lambda employee: employee.employee_name.split()[0]
for employee in employees:
print(firstNameOf(employee))

We save some computation running inside brain by refining it with lambda. One can easily say the code is taking the first name of the employee.

Remember, majority time is not spent on writing new code, but in understanding existing code. When you convert time into money, you will get the point.